Yo siempre he usado Windows, de hecho, he usado todas las versiones desde el 3.11. Incluido en NT, en mi casa siempre ha habido dos PC's: el de mi padre y el mío hasta hace poco y ahora, el de mi novio y el mío... me puedo considerar una pseudo-experta en win, the problem is that the Internet seems to advance faster than me. I am a person who learns by testing and checking ... and clear, I do not have time to try everything out again ... I also think that I've been vague, and when I am not looking for work and more ... And I will say ... What this has to do with Linux?, It's easy: there came a time when several of my programs were unable to play video and I thought why not change?. Took time looking at and talking meneame free software, Firefox, Ubuntu, GNU ... had already begun to be curious. I started slowly: I installed Firefox and Thunderbird two days later. And one day talking about anime (well, I was more than talking, discovering) Dai told me why not install Linux? and, of course, very horny I (decided for whom he has not understood), said: "pos fale." The win is easy to install ... What could go wrong with Linux?. And I got to the task ... I spent a Live CD, I tried, I liked it and started to install my win installed ... could not and said: "Overall, if I have to win re-install it as it is, take it off and it ...". I installed Ubuntu without a win ... and no partition, although the idea was to re-take win, just in case. First of all, that I can not forget that for all that you have to have the CD drive first in the BIOS, you know that program by clicking Start skipping Delete and can only be changed when you are quite sure you are doing ... on new PCs without floppy already defined as well. and also that every time you ask for a password that will be the start tengais you. And of course, speaking in spook told me I had to install from scratch and partitioned, very dignified I find a guide you could help me (and I had previously linked there), I printed it would need y. .. I returned to the nosy to ask soups (How sad). And thanks to Linux users as Damianvila, Hass, Dai, s0phisma, Llorens and many others like Mahama, Liamngls, Carme, ashacz ... that supported the cause with commentary from time to time (I hope not to forget anyone, if I did forgiveness and the comments you put the name ;-)), as I said, thanks to all of them got installed ... and here I leave what we were doing little by little, I explained that in each disc could only be 4 basic partitions, so you could have 4 primary or 3 primary and one extended partition divided into logical to choose the second option and it started with . From the Ubuntu 6.06.1 Live CD went to the terminal (in the top bar: Applications> Accessories> Terminal) and run gparted (by typing sudo gparted), I think for the distance and he was fighting a hostile environment, do not get what we wanted out of this application and tested it with cfdisk (in terminal again: sudo cfdisk). It is an application or program or whatever you call that resembles the old fdisk win, but with a much nicer environment. here is to move the cursor (left-right are used to select the actions listed below, and top-down change of partition).
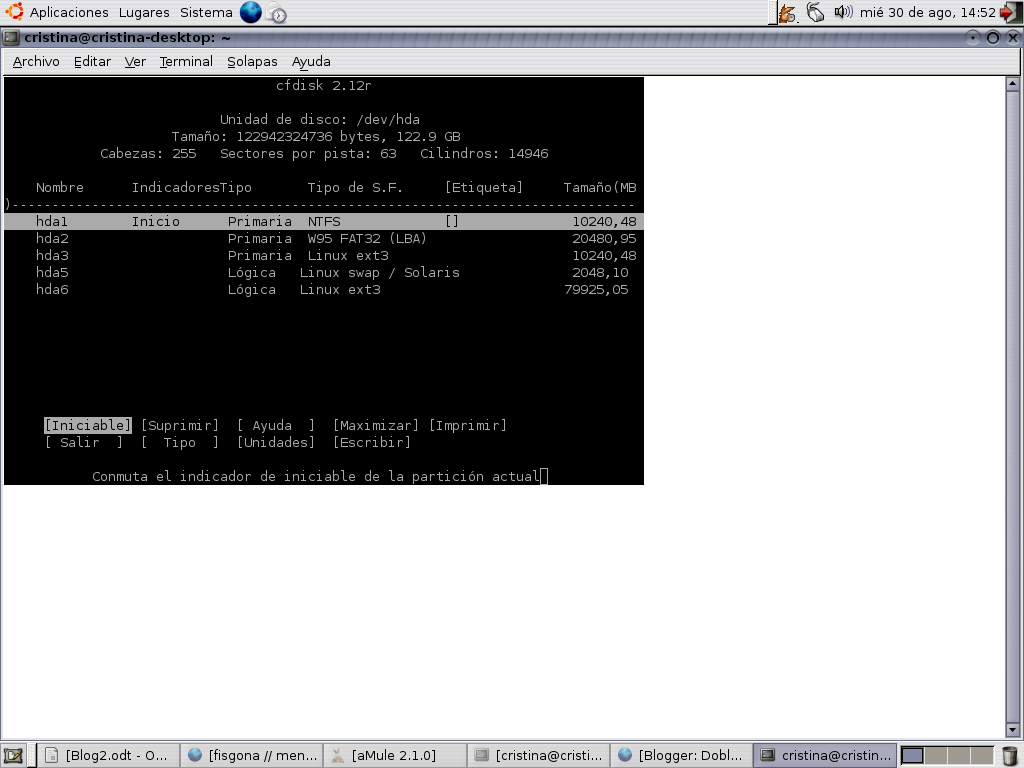 started deleting everything I had to create a single partition: you are choosing the partitions that will appear and choose "delete" (or delete if you are in English). Once done, you can start making the new partitions, in my case would be 5: a Windows OS, another for files win (and would also serve to exchange between win and ubuntu) and the three that need Ubuntu. hda1: The partition for Windows (system) We must choose "new" ("New") and choose the size you want to give, and for me it is a partition of convenience in which I will not put a lot of things (basically games that try, if I may, installed in the following partition) I gave it 10 Gig (10240 MB, at this point, if you are accustomed to using the keypad, make sure it is enabled). Once given the size in Megabytes, elegidla as "Primary" and give to "Start." Once on the first screen you see two partitions: the one you have just done and free space. Choose and make new intro to "Start" ("Bootable"). Then choose "Type" ("Type") and make it Fat32 (it's option 0C). With this we make that partition is created in a format compatible with Windows. hda2: The partition file sharing The steps are similar to the previous partition, saving the data I wanted to have more space here. This partition, as I have explained and I checked, used to save files in either OS and open either on one or the other. Well, that that we summarize the steps I followed: Choose the space, giving new, decide the size (in my case 20480 MB), Primary, Top. On the first screen select the type as fat32 again (option 0C). A clarification: no elijáis NFTS is a valid format for windows but not linux, if you could apply from Ubuntu only read the files. hda3: The Ubuntu partition (system) experts know it as /, so simple ... is the root directory. It will be the last primary we believe, because I told you that there can be no more than 4 primary partitions ... do not know why, but I trust what I have said those who know more than me ;-). The steps are, choose the space provided, again, choosing the size (after hard bargaining I gave 10 GB, like windows), Elementary, Beginning. The type of this partition is Linux (83). hda5: swap partition I flip with this ... it should always be twice the size of your RAM. Apparently Linux gives a concrete space to virtual memory on PC ... may seem silly ... but I in my previous computer I became hysterical every time a game petaba because "there was not enough virtual memory." Of course, with features that had, not surprisingly, the strange thing is that these games start ... Well, apart from my lectures, back to what we want, the swap partition. As you have seen instead of 4 is called 5, this is because it is a logical drive instead of primary. The number 4 is assigned to the primary partition that includes, but is invisible because it is just a kind of the logical container. To create hda4 follow these steps: New, is twice the size of your RAM (in my case I had 1 GB and I gave him 2048 MB), Logic (attention here, do not give him a primary), Top. The type is Linux (83). hda6: The / home files (Ubuntu) as This partition is hda2, but in this case is only for Ubuntu-Linux, as I intend to use only linux, I gave him a brutal size ... perhaps I was mistaken ... but it was like starting from scratch so it will prove a season. Come to this and just ... Again, do not put size and this is what is left of the hard drive, logic, Top. The new type is Linux (83). And we have our partition ready to install. Check that you have been as You wanted below and then choose the command "Write." Installing Windows At this point this will not pose biggest problem (I say), it instaláis as ever. We recognize C: and D:, which are hda1 and hda2, installed on C:, as usual. If you ask to convert to NFTS, tell him so ... but only C:. So the ability to annoy eliminareis win from Linux ;-). In principle you should update the version and configure the hardware ... but I left it for when I want to play a bit different ... Installing Ubuntu We return to the live cd of Ubuntu to see if everything is correct. Q I had already seen the first two partitions were correct, but it turns out from Darwin is not Linux, because Linux curious if you see him ... but good things about Microsoft ... I explained why we first installed Windows, apparently it makes you want to start or not as we want to have two OS on your PC, installing first win then we make sure that Ubuntu-Linux work and we can choose when you really want to win.
 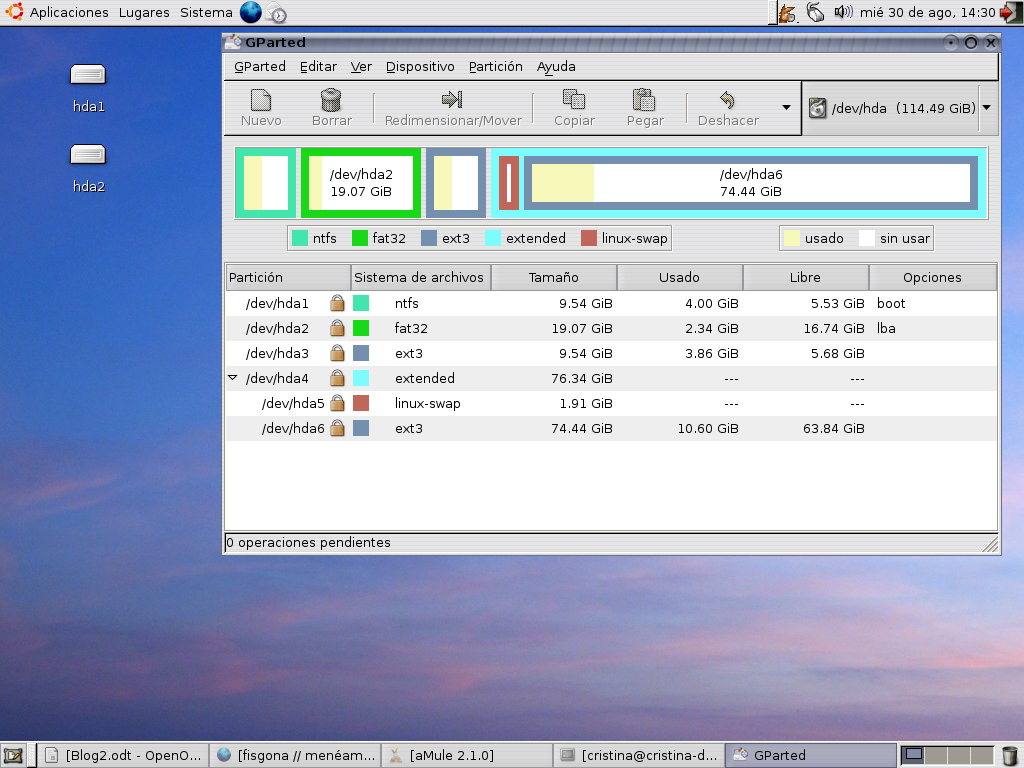 Well, Ubuntu live once we go back to gparted (Applications> Accessories> Terminal and type: sudo gparted) to see how we have the partitions. In my case were all ... hda1 but only recognized as a correct format. So if you pass this is easy to follow the steps I give you and you will have problems: select the partition to appear with the symbol of care next door at the top bar choose Partition, Format and then Styles. Look at this picture for you to see q style should take each partition. Once each has a corresponding style, and we give below a screen with four columns and five rows. This is where we assign to each of the partition function ... the first two leave them as they are unless we mark the second column format (if we did not win in the installation). In the third row selected in the first menu / and leave the rest as it is, in the fourth Put in the first window swap, and the last row Put / home in the first column. The format boxes must be marked on all rows EXCEPT the first (the one with Windows). Once done you can install without problems. The Grub I have no very clear that I wanted to understand that this is "something" that makes the pc boot either operating system. The point is that if you question at some point where you put the MBR you have to say that hda ... And you're done! Nothing friends, so you already have your own Ubuntu-Linux on a PC, sharing with Windows. Now it is to know and learn to use your new OS.


0 comments:
Post a Comment